Hi Guys!
The sequel of Wrecking Ralph is finally out, who is excited about this? I am, and I look forward to watching it with my son at the cinema.
This is for me a very special video as it is a collaboration with Emily from British Girl Bakes.
We have both made a Ralph Breaks the Internet Cake to give you more choices. Go, click this link to have a look at her ? beautiful cake ? https://bit.ly/2TyuyKh.
[ingredients title=”TOOLS AND MATERIALS”]
- Place your list items here
[/ingredients]
[directions title=”HOW TO MAKE “RALPH BREAKS THE INTERNET CAKE””]
- To make the head make an oval using some flesh modelling fondant, press down as 3/4 of it and mark the eye socket shaping the top of the nose as well add a big oval or written tally and put in the middle to make the nose poke two holes to make the nostrils drawn
arch to start make it the mouth and make one hole at the end over the lip with the lip shaper so that is gonna look like is more smiling and then redefine the bottom of the lip as well using our bottle press gently where we’re going to add the eyes the first we’re going to make the ears and we’re going to add a small oval and put it on the side between the eyes and the nose and we’re gonna press it to merger to the head now we’re going to fill a socket with some white fondant then we’re going to add a small tiny bit of brown fondant to make the irises and then press it to make it flat then because the irises are not just a one vivid color we’re going to add a little bit of white edible color inside and you can see that it is already changing it will look more realistic then we need to add some black fondant for the pupils paint with black the top of the eye and all around the irises as well and then with some white we’re going to paint the white lights that we have in the eyes let’s mark now the eyebrows and then we can fill them with some brown fondant and to look a little bit more realistic we just need to draw lots of lines finally uses some pink petal dust the one I’m using here is the one from Rainbow Dash and it’s the one that I love and doing so we’re going to add more dimension to the face and we needto brush gently the nose the cheeks and the lips as well so now the head is done and we can leave it to dry
-
we’re going to make the body we’re going to need a big chunk of fondant the one I’m using here it’s white and it’s going to have a big shoulder and smaller waistline the neck is that part that is going to be same so this is the one that I’m adding now and has to have a flesh color so ruff is wearing blue green t-shirt underneath and so that’s why we’re going to add only a small piece of fondant at the front and then we’re going to add a lot of shape all around the t-shirt color and then going to draw lots of lines on it as well on top of this we’re going to add another t-shirt which is between red yellow and orange I don’t know if you noticed but it has a V shape so we’re going to cut it and then again we’re going to add a stripe all around the color of the shirt and again we’re going to draw lots of lines to make the bottons simpler we need to add three tiny balls of white fondant and then we need to press them in the middle and add four holes in the middle the easiest way to make the checkered shirt I tried in many ways anything the best way is actually painting the fondant with some orange gel paste and this is going to be done in both ways so originally and vertically at this point held orange paint all over my hands and that’s why I’ve decided to place the body on top of a dummy to make it easier for me to work with it now with a really tiny brush I’m going to paint the black lines on the shirt and I always like to start from the back as is if something goes wrong it is always easier to modify it and anyway is gonna stay at the back right and then I’ve painted the lines at the front as well [Music] now it’s time to Hut the head and be careful when you do this because the head could change their shapes so be very gentle with some brown fondant we’re going to make the top front of ralph overall roll your fondant and cut a rectangle add a pocket and draw all the same lines with a tool that it is similar to the one I have here [Music] for the strap we’re going to add a long piece of fondant and again adding the same lines at one end of the shrub I fold in a small piece of grey fondant to add a little darker [Music] now we need to add the overall at the back as well and then I’m going to use the same brown fondant but I’m gonna cut it is a an X shape I’m going to leave one of the shrubs onion out to make the arms roll a big chunk of skin fondant [Music] fold in half and cutter so they were going to have the same size for both arms then we’re going to mark their arms by fray the first mark is the one where the elbow is going to be so you need to press it just a bit and the other one is where the race is going to be and this time you need to present a roller all around them press the hunt I smooth the edges pull the elbow we now are going to make the fingers and to do so we need to make four cuts [Music] mark inside fingers[Music] and close the fingers to make the fist before adding the arms to the body we need to add some broken cocktail stick to support them and now we can put them onto the podiumfinally we need to cover them with some sleeves as well again using the same fondant that we used before the orange one and we’re going to draw the lines and paint it again to make the air first of all we need to cover the whole head with a circle of fondant and then we’re going to add lots of small drops of brown fondant starting with the top of the head then near theears and then we’re going to cover the whole head at the back
-
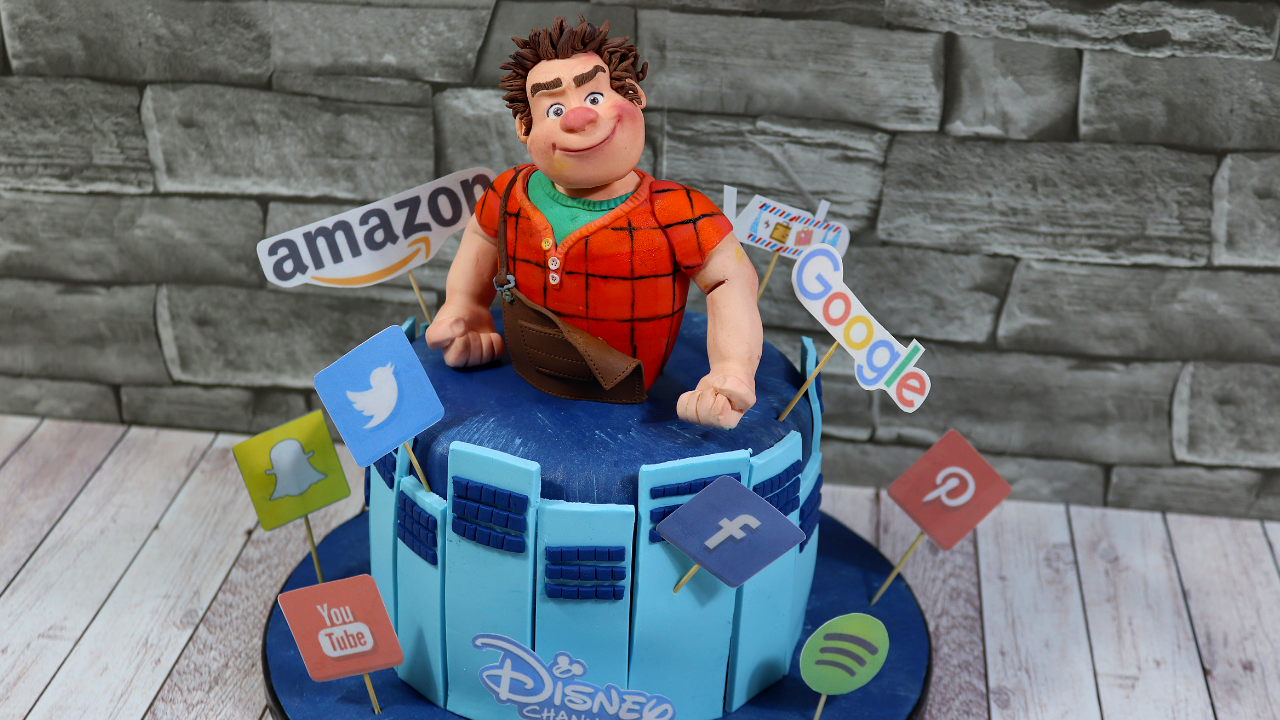
looking at the photo over Rapha breaks the internet and the trailers were I could see that they’ve shown inside of the internet with lots of blue sky liners and that’s why I’m parting lots of rectangles all of different sizes and on each of them I’m also adding some blue windows and then we’re going to put them all around the cake I kick the already covered with blue fondant and I brushed little bit of white petal dust finally about some of the logos that I’ve seen from the trailer and now I’ve put Ralph at the top of middle of the cake so is ready to break the internet I really hope you enjoyed this video and if you did don’t forget to thumbs up to let me know and to help other people to find this video also don’t forget to click here to have a look at British girl bags take bye see you next week.
[/directions]